WooCommerce is the eCommerce plugin widely used for WordPress websites. I love WordPress sites mainly because I learnt how to build websites on WordPress and still build all my own sites, such as this one. With the vast range of plugins available you really can create just about anything.
There are two parts to installing a pixel. One is simply installing the code for tracking and the other is creating a product catalogue which involves syncing your products to Facebook. Both the tools I use do both these steps in one. If you’re only wanting to install the pixel many WordPress themes now have a place in theme settings for you to enter your pixel ID.
If you’re using WordPress with WooCommerce there are 2 different plugins I recommend to install the Facebook pixel depending on the products you sell. If you have fairly simple products without any variants (such as size, colour etc) then I recommend the official Facebook For WooCommerce plugin built by Facebook.
If however you’re selling items with lots of variants such as shoes or clothing you may wish to hide your variants from your product feed so it doesn’t pull through several of the same item. Unfortunately Facebook’s plugin doesn’t allow this easily so if you have variants I recommend Pixel My Site Pro and Product Catalogue Feed Pro. This is only relevant if you plan to connect a product catalogue and run dynamic Facebook ads – which of course you should!
Pixel My Site offer their own tutorial videos if you decide to go that way, so let’s take a look at how to install the official Facebook plugin.
Download The Free Plugin
Head to https://woocommerce.com/products/facebook/ and download the free extension. You will need to login to your WooCommerce account to do so, but rest assured it’s $0.00.
![]()
Install the Plugin on WordPress
On your WordPress Website head to Plugins > Add New.
Select Upload Plugin. I’m assuming you already have WooCommerce installed – this will only work if you do!
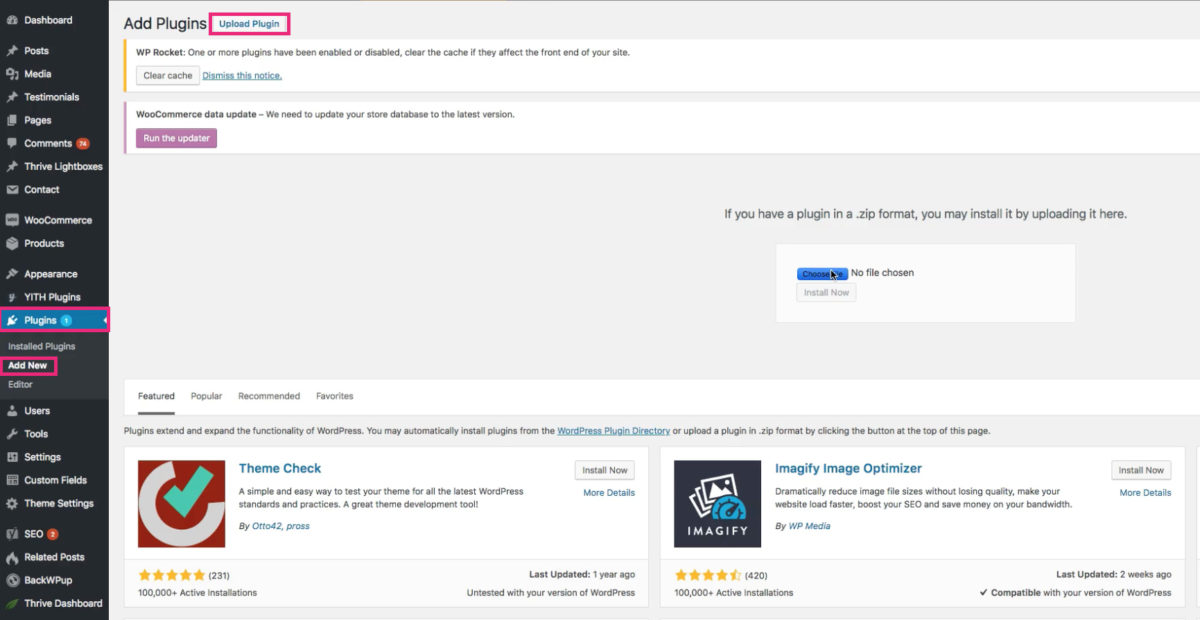
Select the facebook-for-woocommerce.zip file from your computer’s Downloads folder.
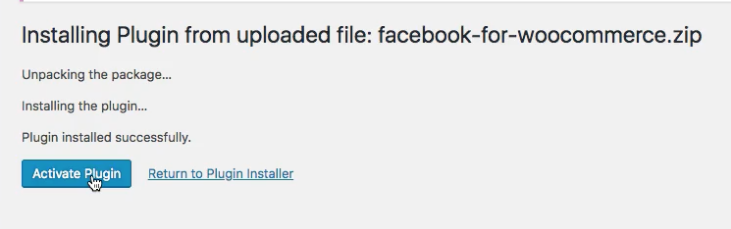
Click to Activate Plugin.
Set up the Plugin
Once the plugin is installed and activated navigate to your WooCommerce plugin settings.
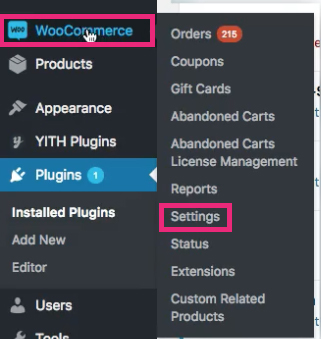 From the top menu select Integration.

Then select Facebook for WooCommerce and click Configure Facebook Settings.

A popup Lightbox will appear. If you don’t see anything try looking behind your current open browser window.
First select the Page you want connected to this website.

Then select the Facebook pixel you would like to install to the website.
![]()
Then sync the products to your Facebook page and ad account. These can take some time to appear in your Facebook ad account and in your page’s shop.

Once you’ve done that, save and you’re all set! The Facebook pixel is now installed to your WordPress site and you have synced your WooCommerce products to your Facebook product catalogue which can be used to create dynamic ads.
To check your pixel is installed correctly install the Chrome Extensions Facebook Pixel Helper. Once the extension is installed on your Chrome browser, visit your website. Click on the extension icon to see which pixels are firing.
![]()
You should have green ticks for the PageView pixel on every page as well as Microdata Automatically Detected.
On each product page you should see ViewContent. This will show a yellow tick until you connect it to a Facebook Product Catalogue.
Test the pixel when adding a product to cart and making a purchase.


Thank you for the great post on how to install the fb pixel to our woocommerce website. As i understand now the plugin do pull our product to our FB shop and it auto install pixel to our woocommerce.
Question:
1. We are using the same pixel on multiple website? Because according to the dialog of the woocommerce plugin, after we select a page according to the page available in out FB, then when comes to the point on installing the pixel, we just have the option to select only 1 pixel.
What if we have multiple website, how can we fetch other pixel?
Hi Joe,
Correct once you integrate your shop using the app it will also install the pixel.
I would recommend creating a new pixel for every website so your traffic data is not all together that way you can re-target people based on the actions they take on the different websites 🙂